Ah, ulundu vada! The golden halo of Tamil Nadu breakfasts, the pride of all moms, and the one snack that can make even the crankiest kid smile. If you’ve ever wondered how this crispy, fluffy wonder is made, don’t worry – I’m here to spill the batter (and maybe some laughs). Let’s dive into the art of making ulundu vada without turning your kitchen into a frying disaster.
Step 1: Assemble Your Vada Dream Team
First things first, you need your ingredients. No shortcuts, no excuses! If you’re missing something, the Tamil mom mantra applies: “Pakkaththu veetla kettutu vaa!” (Ask the neighbors for it!).
Here’s your shopping list:
- Urad dal (ulundu) – 1 cup (soak for 2-3 hours)
- Green chilies – 2, chopped so fine they can’t escape the vada batter.
- Ginger – A small piece (optional, unless you want to impress your paati).
- Curry leaves – Because what is a Tamil dish without curry leaves?
- Black pepper – For that Tamil Nadu temple-style kick.
- Asafoetida (hing) – The MVP of Indian kitchens; just a pinch.
- Salt – Taste test required (kai alavuku—not with measuring spoons, please!).
- Oil – For frying, but it will also end up on your countertop, hands, and possibly the floor.
Step 2: Soak and Grind Like a Boss
- Soak the Ulundu: Wash the urad dal well. Soak it for 2-3 hours. Don’t forget, or you’ll end up with crunchy vadas. Nobody likes crunchy vadas.
- Grind Smoothly: Transfer the soaked dal to a grinder or mixie. Grind it into a smooth paste. Add water sparingly – you don’t want a batter that flows like Chennai’s Adyar River in monsoon.
- Check the Fluffiness: Your batter should be so light and airy that if you smack it, it says “thank you” and bounces back.
Pro Tip: If your batter turns runny, blame the grinder. Never yourself. That’s the rule.
Step 3: Add Some Masala Magic
Now that your batter is ready, it’s time to make it fancy.
- Throw in the green chilies, chopped ginger, curry leaves, black pepper, and a pinch of hing.
- Mix it all together with your hand. Why? Because according to Tamil tradition, your hand adds the secret ingredient: anbu (love).
If the batter feels heavy, give it a pep talk: “Nee light-a iru!” (Stay light!)
Step 4: Shaping the Vada – Channel Your Inner Sculptor
- Wet Your Hands: This is crucial. Without wet hands, shaping vadas is like trying to do Bharatanatyam in tight jeans. Not happening!
- Make the Hole: Take a small ball of batter, flatten it on your palm, and use your thumb to make a hole in the center. Remember, the hole is the soul of the vada. No hole, no vada – just a glorified bonda.
If you struggle with shaping:
- Use a banana leaf.
- Or call your mom. She’ll do it in seconds and also criticize your grinding skills.
Step 5: Frying – The Real Test of Patience
- Heat the Oil: Fill a deep pan with oil. Test it by dropping a tiny bit of batter. If it sizzles and rises like your ego after getting compliments, it’s ready.
- Fry the Vadas: Gently slide the vadas into the oil. Don’t just toss them in like cricket balls – they’re fragile babies.
- Flip It Like a Pro: Flip the vadas occasionally to make sure they’re evenly golden. But don’t flip too soon, or they’ll sulk and break.
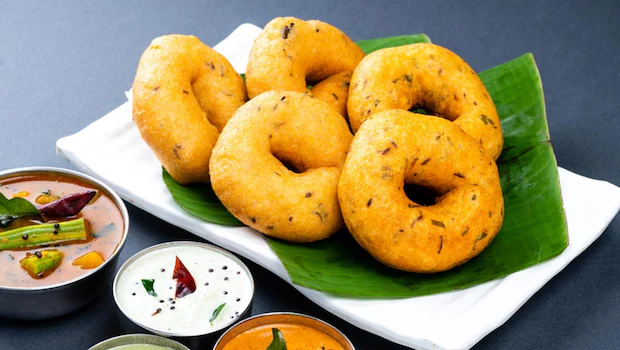
Step 6: The Moment of Truth – Serve It Up
Place your crispy, golden vadas on a plate lined with tissue paper (to soak up the oil and your guilt). Pair them with:
- Coconut chutney: This isn’t just any chutney; it’s the star sidekick to your vada. Made from freshly grated coconut, green chilies, and roasted gram dal, it’s the dish that makes people say, “Vada ku chutney illa na, life-e waste!” (Without chutney, life itself is pointless!).
Temper it with mustard seeds and curry leaves, because what’s a Tamil chutney without that sizzling drama? If someone says they don’t like coconut chutney, question their life choices – can you even trust them?
- Sambar: Hot, tangy, and packed with veggies, it’s the ultimate dipping companion. Dunk your vadas until they’re soaked and enjoy the squishy goodness!
Take a bite, and if the combo of crispy vada, creamy chutney, and flavorful sambar makes you do a little kuthu dance in the kitchen, you’ve officially entered Tamil food heaven. If not, just eat it anyway – ulundu vada saptaale happiness!
Comedy Pro Tips
- If your first vada doesn’t turn out perfect, don’t worry. Call it a "designer vada."
- If the batter runs out before frying all the vadas, blame your family for "testing too much."
- Remember, frying is an art, not a science. If the oil splashes, laugh it off – every kitchen has its war stories!
So, enna pa? Ready-a? Go soak that dal, fire up the stove, and let the ulundu vada magic begin! Just make sure you don’t eat them all before serving – it’s harder than it sounds.
Tata! Saapdu, enjoy pannunga! 🍴
